
Though we may be increasingly digital in the way we network and seek new business, a print business card is still one of the most important self-promotional tools you can have to hand. You never know when a new networking opportunity might arise!
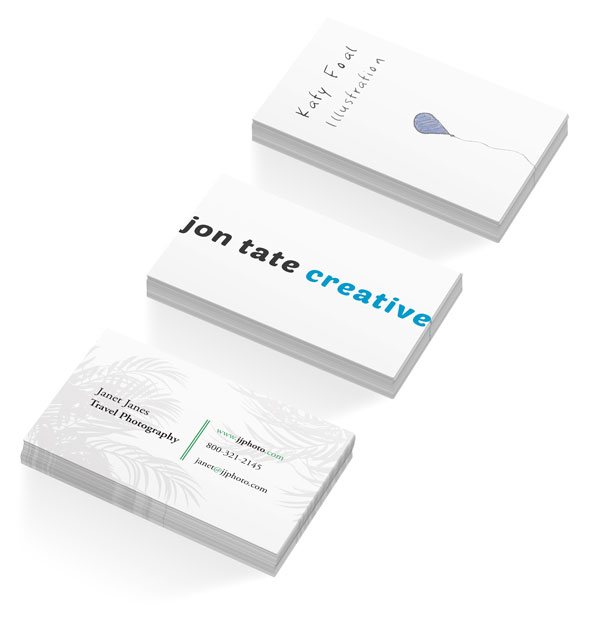
In this tutorial we’ll explore how to create high-impact, audience-appropriate business cards for your own promotional purposes. You can look at how I put together inspiring examples for a fictional Graphic Designer, Illustrator and Photographer using InDesign, and lay down the Golden Rules of creating striking and unforgettable cards: minimal design, legible text, and appropriate audience! With these rules in mind, you can experiment to your heart’s content with text styles, color and even graphics.
During this tutorial I will hop over to Illustrator and Photoshop to create some of the artwork, but this is optional for your own designs. After all, simple designs which emphasize typography and white space really can look the business!
Firstly, let’s put together a basic template for your business card, which you can use to experiment with your own card designs.
1. Set Up the Template for Your Business Card
Step 1
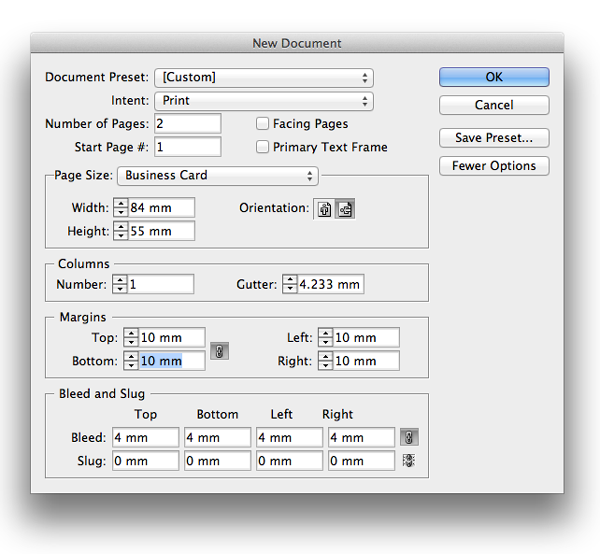
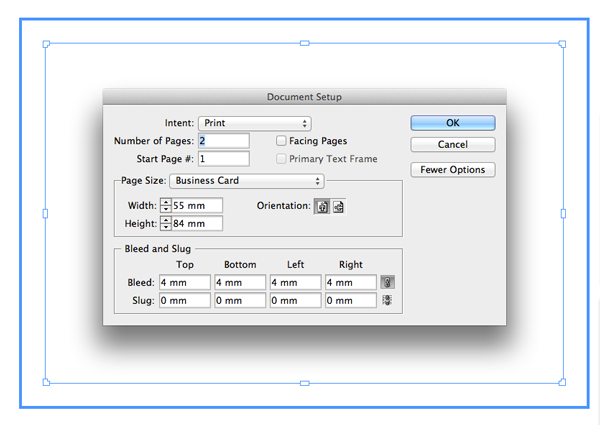
Open InDesign and select File > New Document. In the New Document window set the Intent to Print and set the No. of Pages to 2. Deselect Facing Pages.
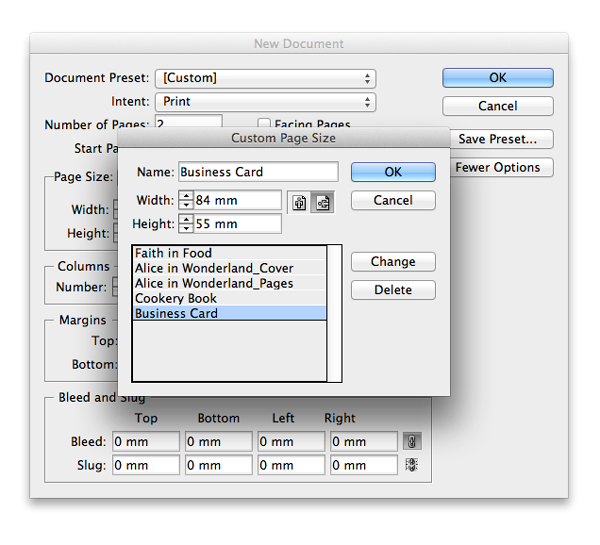
Under Page Size select Custom... from the drop-down menu to open the Custom Page Size window. Under name type ‘Business Card’ and set the Width to 84 mmand Height to 55 mm. This is a standard card size for some popular online card printers and is generous enough to give your design some space. Click Add, and thenOK.
Set the Margins on all sides to 10 mm for now, though we can change this later depending on the design. Set the Bleed all round to a generous 4 mm. Click OK.
2. If You’re a Graphic Designer...
...your clients will come to you for potentially all sorts of things: print work, websites, exhibition materials etc. It’s likely that at least some of your clients are commercial businesses, and they want to hire a designer for their professionalism as well as their talent for typography.
Because your business is multi-faceted, and can include all sorts of different projects, it would be unwise to feature just one, or even a couple of, project images on your card to risk being pigeon-holed as being only capable of doing book covers, for example.
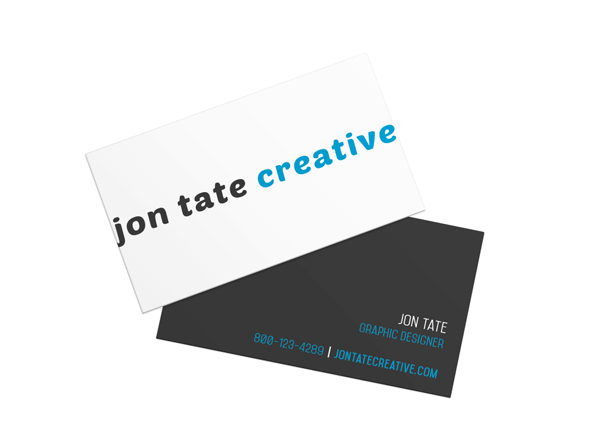
You also don’t want to crowd your tiny card with images, which leads to the first Golden Rule of business card design: if in doubt a Minimal Design always has the most impact. So, for this example of a card that might suit a graphic designer, I’ve givenemphasis to the typography, stripped out any images and stuck to a limited color palette.
Step 1
Return to your InDesign template that we set up in Section 1 (above).
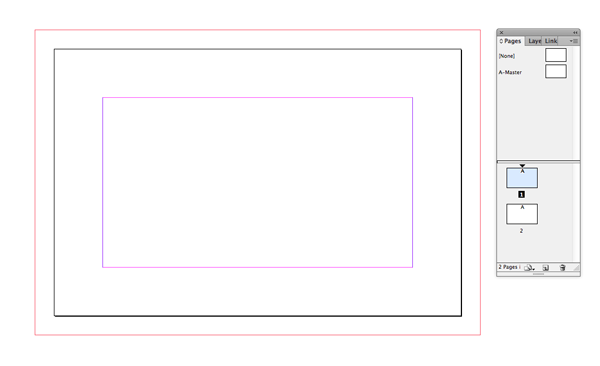
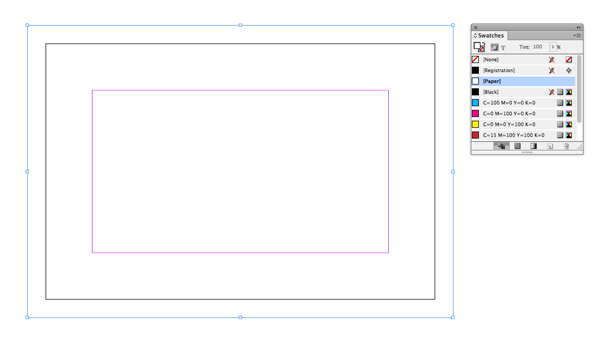
With the first page brought up on screen, go to the Pages Tool (Shift-P) in the Toolspanel. Go to Layout > Margins and Columns... and set the Margins to 5 mm. Repeat for Page 2.
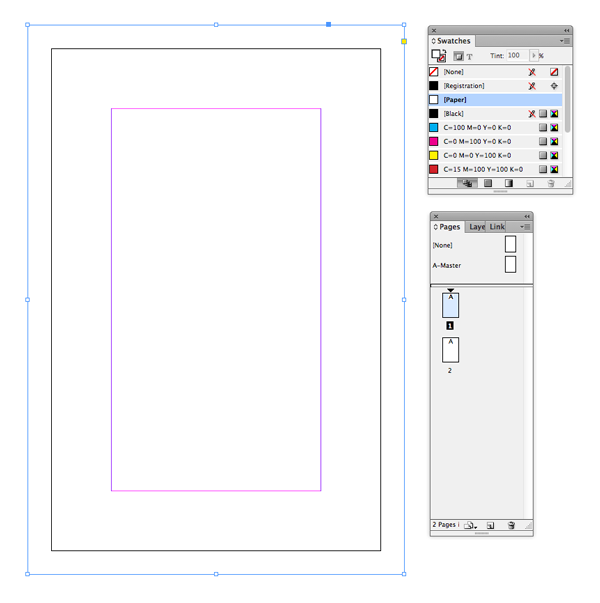
Return to Page 1 of the document and use the Rectangle Tool (M) to create a frame that extends across the whole card up to the edges of the bleed. Set the Fill to [Paper]. With the frame selected, Edit > Copy and click on the Page 2 icon in the Pages panel (Window > Pages) to bring up Page 2 on screen. Click Edit > Paste in Place.
Step 2
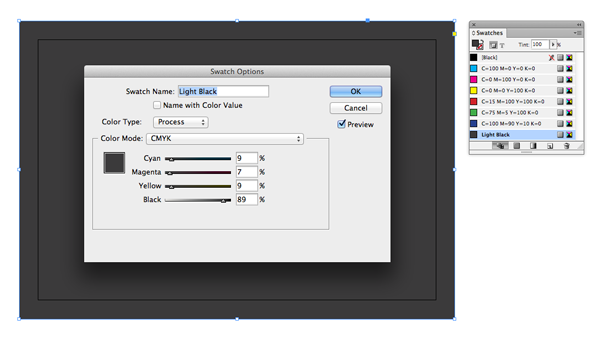
Open the Swatches panel if not already open by going to Window > Color > Swatches. Click the New Swatch icon at the bottom of the Swatches panel to open a new window.
With the CMYK mode selected, set the Cyan slider to 9, Magenta to 7, Yellow to 9, and Black to 89. Rename this swatch ‘Light Black’. A pure black can be harsh; this will soften the appearance of the card.
Set the Fill of the pasted frame on Page 2 to ‘Light Black’.
Step 3
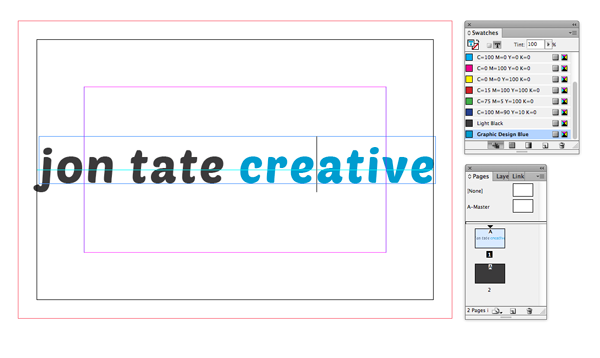
Return to Page 1 of the document, or the FRONT of the business card. This should be the right place for a logo, if you have one, or simply your name and job title.
Use the Type Tool (T) to create a text frame 84 mm in Width and 10 mm in Height. Type ‘your or your business’ name’; in this example ‘jon tate creative’. Set the text toAlign Center from the Character Formatting Controls panel at the top of the screen.
Now you can select a font that is either your brand type, or find something that you feel reflects your design aesthetic and looks cutting-edge and contemporary. I went for a playful Sans Serif font, Poetsen One.
Set the Font Size to 28 pt, Tracking to 50 and the Color to ‘Light Black’, as before.
Drag a horizontal guideline down from the top ruler to the center point of the card (27.5 mm) and use this to position the text frame on the horizontal center of the front of your card.

For a color ‘pop’ create a New Swatch in the Swatches panel, and set the values toC=100, M=13, Y=10, K=0. you can rename this ‘Graphic Design Blue’. Note: if you use a brand color that you’d like to also use on your cards, it may be best to use a Spot Pantone color to produce the correct printed result.
As tempting as it may be to add more ‘stuff’ to the front of your card, practice restraint and keep it minimal. You can now add your contact details on the reverse of your card.
Step 4
Bring up Page 2 of your document on screen. This will be the REVERSE of your business card.
Introduce a new text frame using the Type Tool (T) 74 mm in Width and 19 mm inHeight. Center the frame on the card between the margins, resting the bottom edge against the lower margin.
Type ‘Name (paragraph break) Job Title (paragraph break) Optional Description of Services (paragraph break x2) Telephone Number(s), Email Address and/or Website’.
Choose a different font to use here to the front of your card; it’s really important you use something that’s going to be clear and legible, even at a reduced size. I’ve gone for an all-caps Sans Serif, Mohave, which is a great choice for making your contact details stand-out while maintaining a graphic, contemporary look.
Set the Font of all the text to Mohave Regular, Size to 10 pt, Leading to 14 pt andTracking to 20. Highlight ‘Name’ alone and set the Size to 12 pt and the Color to[Paper]. Highlight the remaining text and set the Color to ‘Graphic Design Blue’. Highlight your website or email address and set the Weight to Bold to make it really stand-out. This is how most clients will initially search for you or contact you.
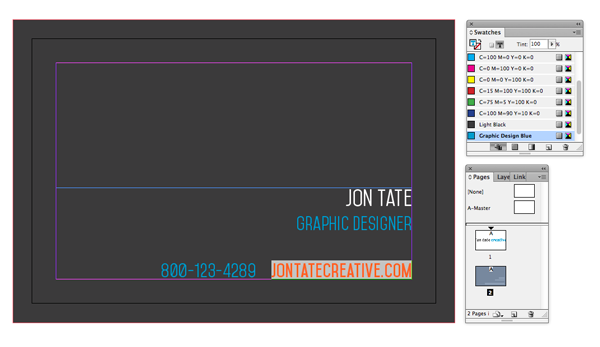
You can also introduce a solid 1 pt stroke in [Paper] between the telephone number and website address using the Line Tool (\) to visually separate the information.
Great work - you have a minimal yet striking card design that will attract new clients! Skip to the bottom of the tutorial to read how to export your card for print.
3. If You’re an Illustrator...
...you want to attract clients who are looking to commission creative, unique work from a talented, artistic individual with a head for business. Phew, that’s quite a big impression to give using just a tiny piece of card!
You will have your own illustrative style, and this should be brought out in the design of your card. You shouldn’t try to cram your card with images of your work, but a small graphic can look great and be uniquely tailored to your business venture.
In the example detailed below, I’ve used my own sketched graphics to give you an idea of how you can maintain a minimal design while including pieces of your illustration work. You may even want to custom-produce an illustration for your business card.
Step 1
Return to your InDesign template that we set up in Section 1 (Above).
Flip the page’s dimensions by going to File > Document Setup... to open theDocument Setup panel and clicking on Portrait Orientation.
Go to Page 1 of the document and use the Rectangle Tool (M) to create a frame that extends across the whole card up to the edges of the bleed. Set the Fill to [Paper]. With the frame selected, Edit > Copy and click on the Page 2 icon in the Pages panel (Window > Pages) to bring up Page 2 on screen. Click Edit > Paste in Place.
Step 2
So now we have an unusual layout for this card - it’s a great tip to switch the orientation of your card to a portrait format; it provides interest and more vertical length for any tall graphics.
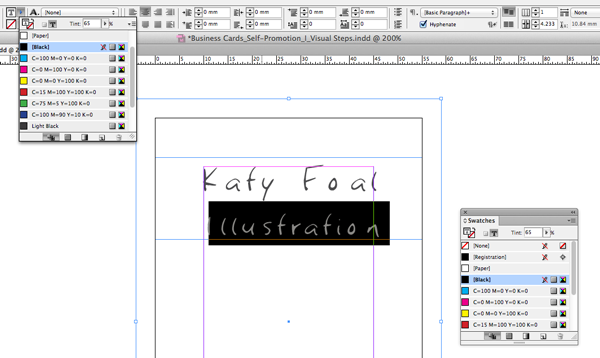
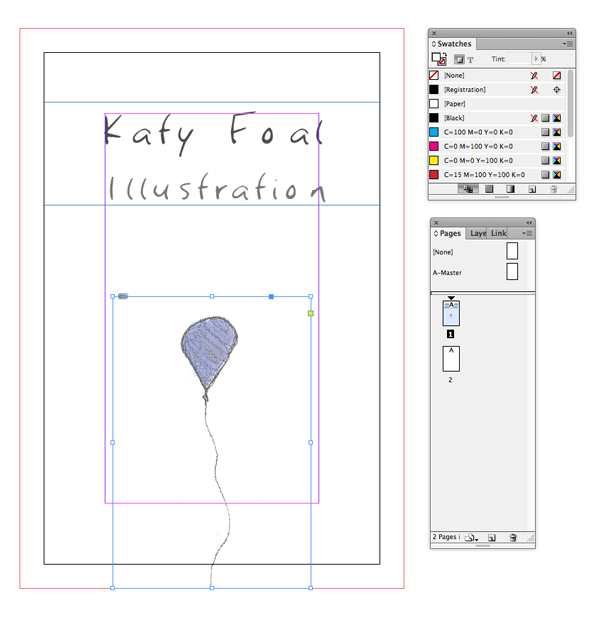
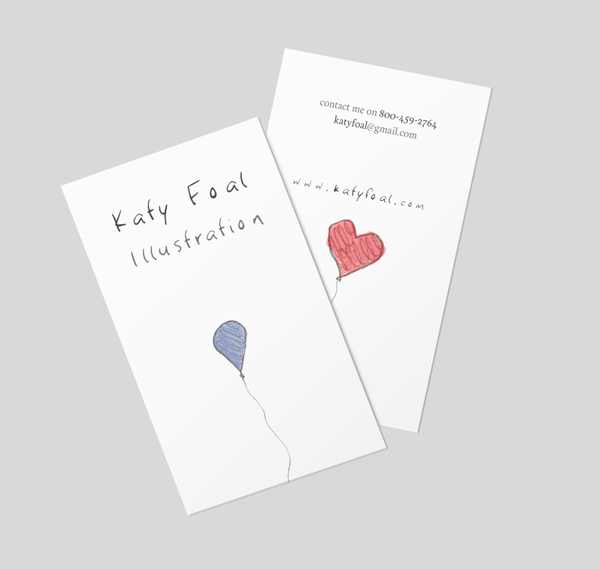
Return to Page 1 of your document and use the Type Tool (T) to create a new text frame 55 mm in Width and 17 mm in Height. Position this at the top of your card, close to the top margin. Type ‘Name (paragraph break) Job Title’ or ‘Business Name(paragraph break) Your Name’; or in this fictional example ‘Katy Foal (paragraph break) Illustration’.
Because this card is tailored for an Illustrator, we might want to use a font that reflects what you do for a living - which is at its most traditional, drawing with pencil and paper. So I’ve gone for a scrawly, handwritten font which is still lovely and legible, Bon Iver. There are lots of handwritten fonts out there, some are great and some are...well...less great, so choose wisely!
Highlight all the text and set the Font to Bon Iver Regular; select Align Center from the Character Formatting Controls panel at the top of your screen.
Highlight ‘Name’ and set the Size to 27 pt. Set the Color to a Tint of 85% [Black]. Highlight ‘Job Title’ and set the Size to 24 pt (unless your name is longer than your job title) and Color to a Tint of 65% [Black]. The text should fit within the margins, leaving a good 10 mm space between the text frame and the printable edge of the card.
Step 3
This is a great place to add a little illustration to your card. I put together a couple of balloon sketches which I then post-edited in Photoshop to remove any background discoloration and improve Contrast.
Use the Rectangle Frame Tool (F) and File > Place to insert a suitable image andClick Open. Use the Fill Frame Proportionally option from the top control panel to adjust the image scale until you are happy with the result. To directly adjust the scale of the image Double-click within the image frame and hold down Shift as you resize.
Step 4
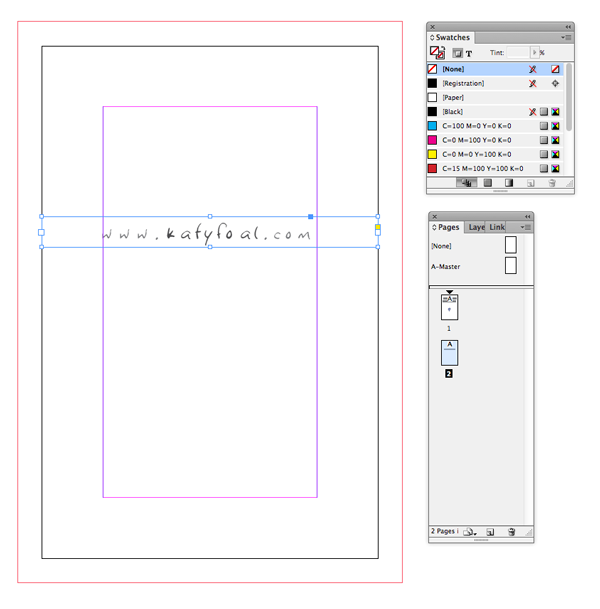
Double-click the Page 2 icon in the Pages panel (Window > Pages) to bring the page up on screen. This will be the REVERSE of your card.
Use the Type Tool (T) to create a new frame 55 mm in Width and 5 mm in Height. Place this just above the horizontal halfway point of the reverse of your card. Type ‘your website’ and set the Font to Bon Iver Regular, Size 14 pt and Align Center. Set theColor of the central website name to a Tint of 85% [Black] and the ‘www.’ and ‘.com’ to a Tint of 65% [Black].
Step 5
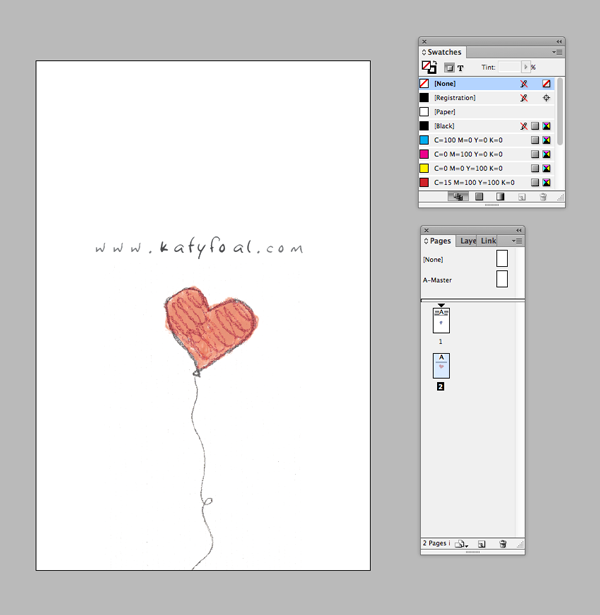
Use the Rectangle Frame Tool (F) to create a new image frame and File > Place. Select a related, but slightly different image, to the one on the front of your card, andClick Open. Adjust the scale, as before, until you are happy with the result.
Step 6
You can list your contact details at the top of the card, but here presents an opportunity to stress my second Golden Rule of business card design: Always choose legibility of text over style!
The handwritten font we’ve used so far has been great for creating an eye-catching headline, and a large-scale website address; but it won’t be suitable at smaller-scale as it may become difficult to read. So I’ve chosen a second font in this example, a classic and clear Serif, Calendas Plus.
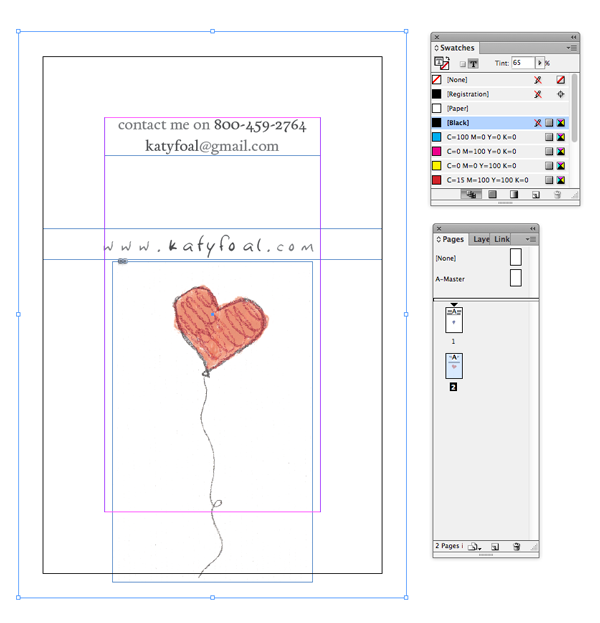
Create a new text frame using the Type Tool (T) and type ‘telephone number(paragraph break) email address’. Set the Font to Calendas Plus Regular, Size 7 pt, Leading 10 pt and set the Color to [Black], Tint 65%. Pull out any more important words or details in a Tint of 85%.
Awesome work - you now have a beautiful business card design for attracting some potential commissions! Skip to the bottom of the tutorial to read how to export your card for print.
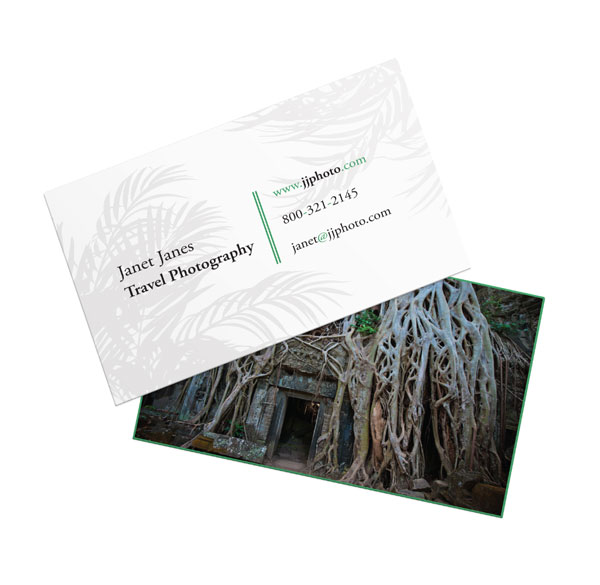
4. If You’re a Photographer...
...you may have a specialism within your field, such as Events, Travel or Portraiture. You may have several different specialisms, and in this case one business card design might not be enough to reach a variety of different clients who are looking for different things. Many printers now offer the technology to print several different designs on the reverse of your cards for little or no extra cost - for photographers this is a great way of showing a potential client your range of work, or targeting a client with a particular photo or design you feel will have greater appeal for them.
In the example below, I put together a card with a photo reverse - you can interchange this with a number of different options of your own work. Because a photographer’s trade is heavily visual, you should use your business card as an opportunity to showcase your best work (or, even better, your most commercially appealing work).
This leads to the last Golden Rule of business card design: design a card that is audience-appropriate! Research your target market - what would they want from a photographer? You might want to show off shots from your most creative shoot on your cards, but a client might prioritise the relevance of content and a professional attitude over your artistic ability.
Step 1
Return to your InDesign template that we set up in Section 1 (Above).
With Page 2 of the document brought up on screen, go to the Pages Tool (Shift + P) in the Tools panel. Go to Layout > Margins and Columns... and set the Margins to 0.5 mm.
Return to Page 1 of the document and use the Rectangle Tool (M) to create a frame that extends across the whole card up to the edges of the bleed. Set the Fill to [Paper]. With the frame selected, Edit > Copy and click on the Page 2 icon in the Pages panel (Window > Pages) to bring up Page 2 on screen. Click Edit > Paste in Place.
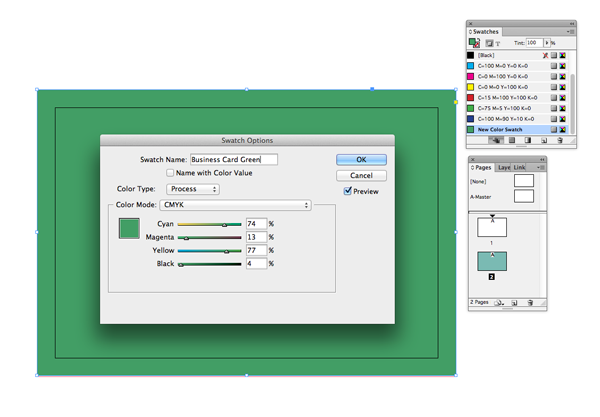
With the frame selected, open the Swatches panel (Window > Swatches) and click the New Swatch icon at the bottom of the panel. Set the values to Cyan=74, Magenta=13, Yellow=77 and Black=4. Rename this swatch ‘Business Card Green’. Ensure the Fill of the frame on Page 2 is set to ‘Business Card Green’.
Step 2
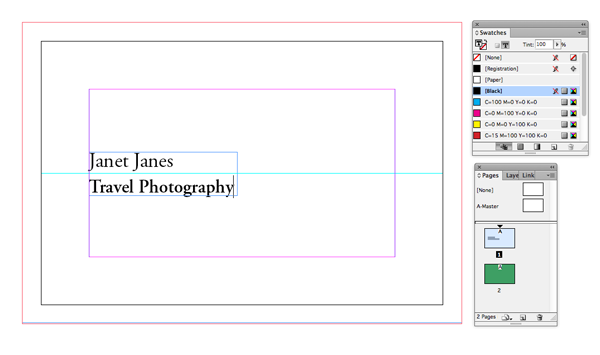
Return to Page 1 and drag a horizontal guideline down from the top ruler (go to View > Show Rulers, if not already visible) to the center point of the card, at 27.5 mm. Introduce a new text frame using the Type Tool (T) 31 mm in Width and 9 mm inHeight and position this on the left of the card, resting against the left margin and centered on the guideline.
Type ‘Name (paragraph break) Job Title’ and set the Font to a classic Serif font. I’ve gone for Adobe Garamond Pro. Highlight the ‘Name’ alone, and set the Font toRegular, Size 12 pt, and Leading 15 pt.
Highlight ‘Job Title’ alone and set the Weight to Semibold, Size 11 pt, and Leadingto 15 pt (unless your name is longer than the job title, in which case reverse the sizing).
Step 3
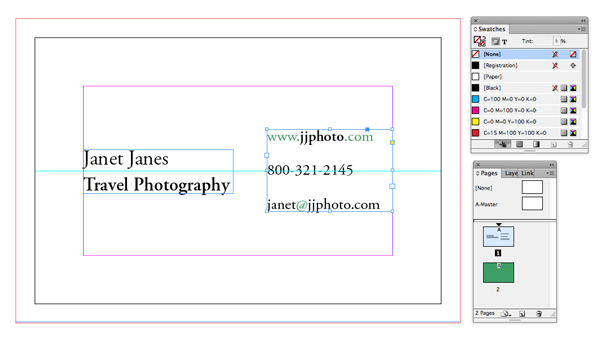
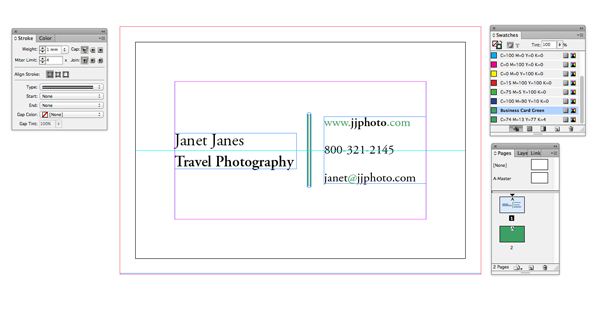
Remaining on Page 1, introduce a second text frame 26 mm in Width and 17 mm inHeight and position this on the right-hand side of the card, centered on the guideline, with the right-hand edge of the frame resting against the right-hand margin.
Type ‘Website Address (paragraph break) Telephone Number (paragraph break)Email Address’ and set the Font to Adobe Garamond Pro Regular, Size to 9 pt andLeading to 20 pt. You can pull out key words or details in Bold, and give less important letters and glyphs a Color of ‘Business Card Green’.
Step 4
Use the Line Tool (\) from the Tools panel to create a vertical stroke (hold down Shiftto keep it straight) 18.5 mm in Length. Open the Stroke panel by going to Window > Stroke. Set the Weight to 1 mm, and the Type to Thick-Thick.
Position this between the two text frames on Page 1.
Step 5
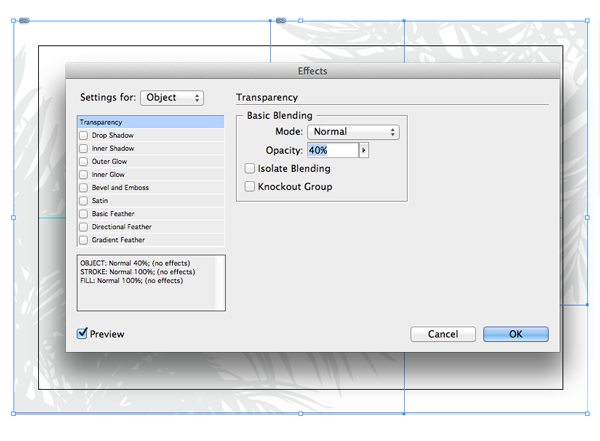
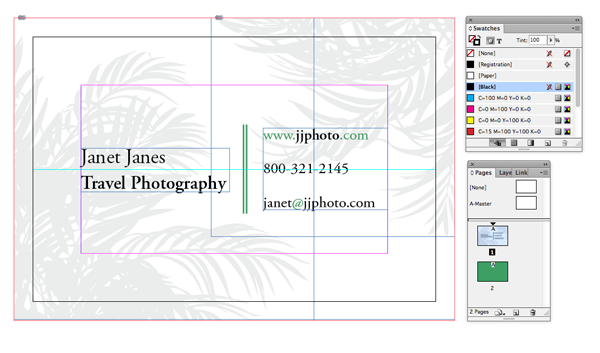
You can introduce a background vector graphic on the front of your business card to sit behind the text and give the card some context. As this is a Travel Photographer’s card, I’ve introduced an Illustrator graphic of palm fronds (set with a Black Fill, with anOpacity of 20% in Illustrator) in two image frames using the Rectangle Frame Tool (F).
The first image frame is copied and pasted (Edit > Copy > Paste) and flipped (Ctrl-Click (Mac) or right-Click (PC) and Transform > Flip Vertical, and Repeat,selecting Flip Horizontal) and each frame positioned in the opposite corners of the card.
I drag to select both frames and Object > Effects > Transparency... and set theOpacity to 40%. Click OK.
With the two image frames and the background White frame selected, Right-Click andArrange > Send to Back.
Step 6
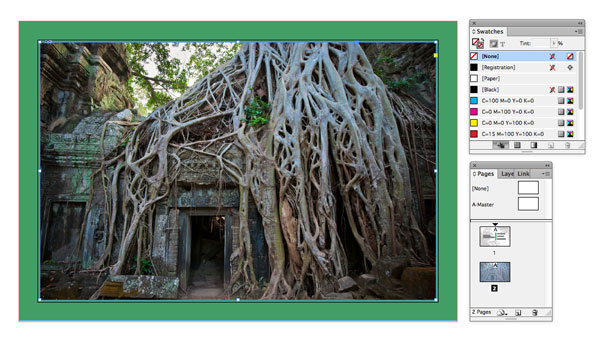
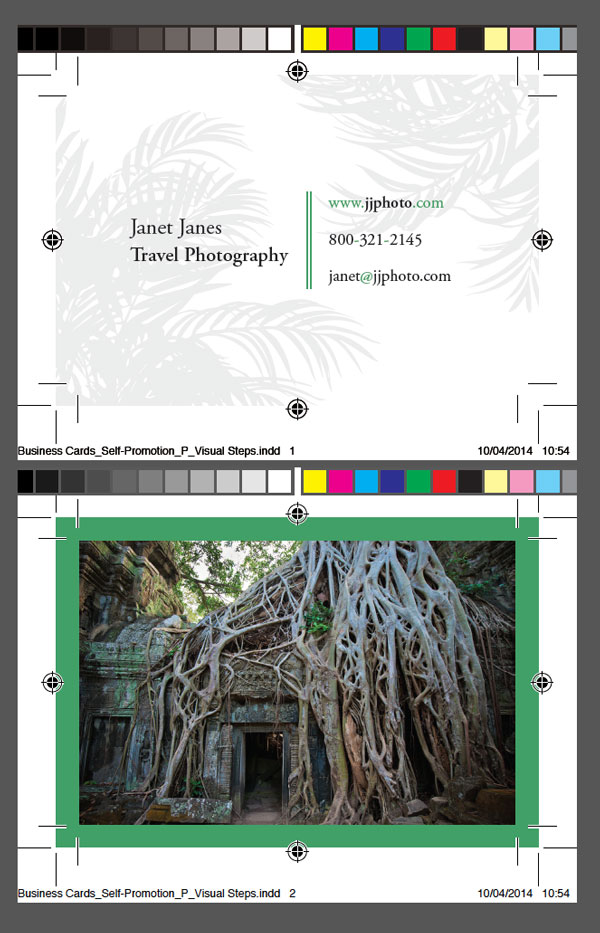
Go to Page 2 of the document and use the Rectangle Frame Tool (F) to create a frame that extends to the edges of the margins (not all the way to the edges of the card). Go to File > Place, select a suitable photo (here I used Photodune_AngkorTempleCambodia), and Open. Use the Fill Frame Proportionally option in the top control panel to scale the image.
You can drag the Page 2 page icon in the Pages panel down to the Create New Pageicon to copy this reverse page of the card, and introduce a variety of photo options.
Great work - you have a gorgeous card design that showcases your work and will engage potential new clients! Read on to learn how to export your card for print.
5. Export Your Card Ready For Print
Step 1
With your chosen card design open in InDesign, go to File > Export... to open theExport window. Select Adobe PDF (Print) from the Format drop-down menu. Name the file and click Save.
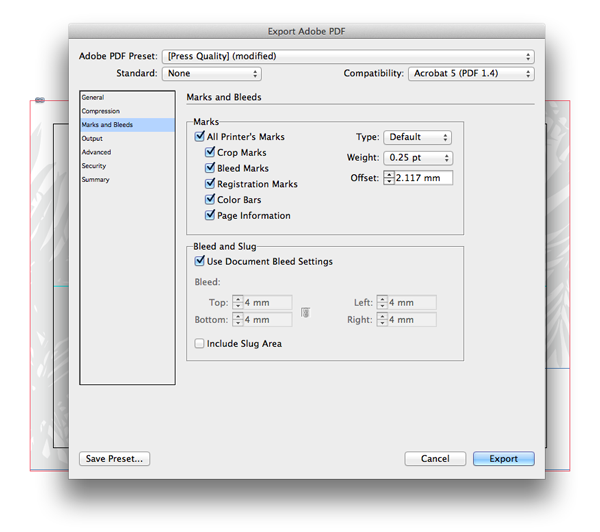
In the Export Adobe PDF window select Press Quality from the Adobe PDF Presetdrop-down menu, and keep Pages selected.

Under the Marks and Bleeds section, click to select All Printer’s Marks under theMarks menu and click to select Use Document Bleed Settings under the Bleed and Slug menu. Click Export.
Happy Networking!
You now have your business card ready to be sent to the printers. Specify a minimum paper weight of 350 gsm (maximum weight of 600 gsm) for a beautiful printed result.
0 Response to "Get Yourself Noticed! Create a Simple Business Card in InDesign"
Post a Comment
Tolong setelah membaca harap berkomentar atau membagikan link web site ini.